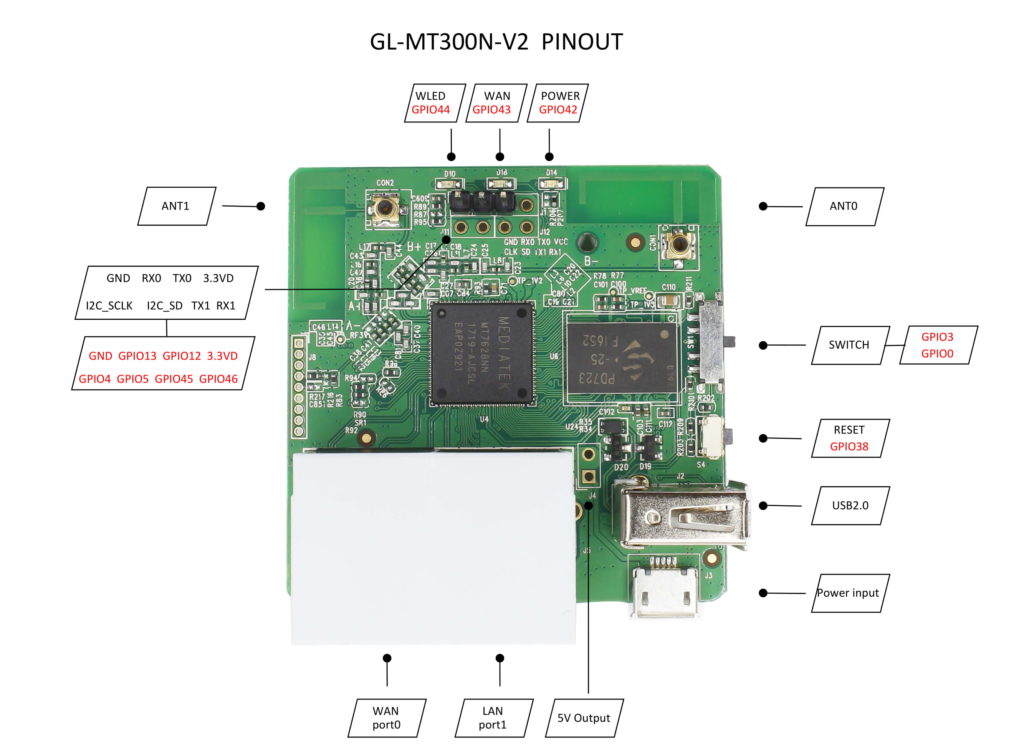
I recently found out about and got one of these:

This device is powered via MicroUSB, has a WAN/LAN ports, and can run a wired and wireless network that is connected to the internet via a ethernet cable in the WAN port, another wireless network, or via a “tethered” device connected to the USB-A port.
It comes from the factory with a reskinned old version of OpenWrt. The objective of this post is to document how to replace this with stock OpenWrt and provide an minimal configuration.
Acquire OpenWrt Firmware:
- Go to downloads.openwrt.org
- Go to the current stable release
- “ramips”
- “mt76x8”
- “glinet_gl-mt300n-v2-squashfs-sysupgrade.bin”
- Download the file and make a note of the SHA256 hash
- Once downloaded you can verify the hash (on Mac OS it’s “shasum -a 256 <filename> )
Replace Stock Firmware
- Take Mango from box
- Put Mango “in-line” to your computer such that your computer is connected to the LAN interface and your home network is connected to the WAN interface. Your computer should still be connected to the internet as the stock configuration will work out of the box.
- Log into the interface (192.168.8.1)
- It will make you select a language and choose a password
- Go to the “Upgrade” option on the left and go to the “Local Upgrade” tab
- Upload the file you just downloaded by dragging it into the box or browsing to it
- Disregard the warnings about unknown firmware
- Confirm the SHA256 hash matches
- Deselect the “Keep Settings” option
- Upgrade
- At some point your computer will lose it’s network settings and will be given a new IP address in the 192.168.1.0 range.
- Open a new browser window and browse to http://192.168.1.1
- Congrats you are now on OpenWrt
Minimal Configuration of OpenWrt
- System -> System
- General Settings tab
- Change the hostname (optional)
- Save & Apply
- General Settings tab
- System -> Administration
- Router Password tab
- Create a Password
- Save
- SSH Access tab
- Interface -> lan
- Save & Apply
- (I am not an OpenWrt user. But is SSH really accessible to the WAN interface by default? “if unspecified, on all”? Is there a firewall rule in place or something? I might come back to this. There is probably a good reason.)
- Router Password tab
- Network -> Interfaces
- Interfaces Tab
- Edit the LAN interface
- Under the General Settings Tab is where you can change the subnet for your network under the IPv4 address and IPv4 netmask options.
- Save
- Save & Apply
- Open a new browser session and browser to the new IP address (http not https)
Creating a Wireless Network
- Network -> Wireless
- Edit the “SSID: ” option
- Under Interface Configuration
- General Setup tab
- Change the ESSID to whatever you want
- Wireless Security tab
- Encryption -> WPA2-PSK
- Key -> THISWILLBEYOURWIFIPASSWORD
- Save
- Save & Apply
- (If it still reads as “Wireless is disabled” click “Enable”)
That should be enough to get you off the ground.
Future posts might include
- How to get interface to use HTTPS
- Use device as VPN Client
- Apparently you can chance the behavior of the status LEDs?
- What about that switch? Can we change that?
- Wait this thing have GPIO pins?

